
The way you brew coffee changes everything - flavour, texture, and aroma. This guide compares eight popular methods, their processes, and what makes each one stand out. Whether you're after a quick cup or a rich, full-bodied brew, there's an option for you. Here's a quick breakdown:
- Pour Over (V60): Clean, crisp flavours; highlights bright acidity. Needs precision.
- Chemex: Light, clean coffee; great for groups. Requires thick filters.
- French Press: Rich, bold coffee with oils intact. May leave sediment.
- AeroPress: Smooth, quick brew. Portable and easy to clean.
- Espresso: Intense, concentrated shot with crema. Needs skill and equipment.
- Moka Pot: Stovetop method for strong, concentrated coffee. Affordable.
- Cold Brew: Sweet, low-acid concentrate. Takes 12–24 hours.
- Clever Dripper: Combines immersion and filtration for balanced flavours.
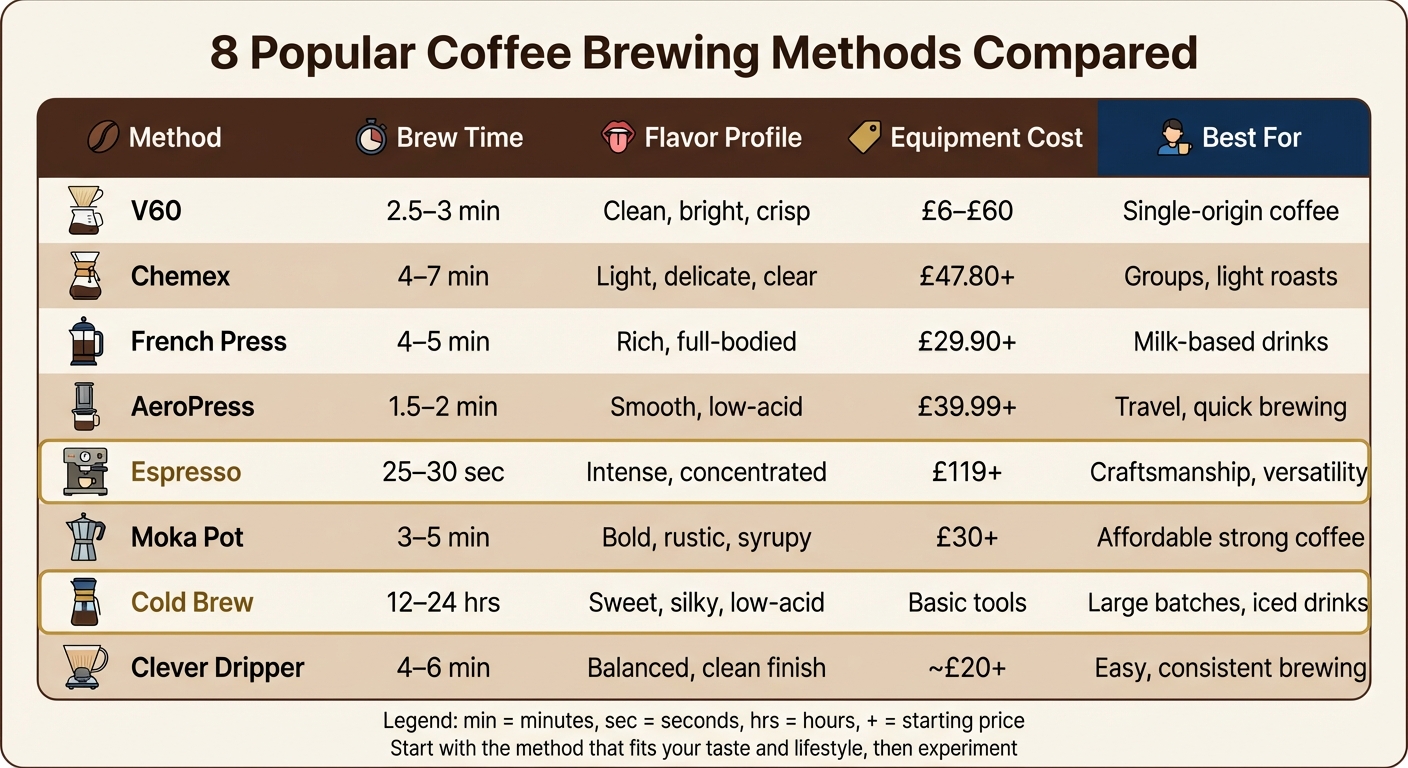
Quick Comparison
| Method | Brew Time | Flavour Profile | Equipment Cost | Best For |
|---|---|---|---|---|
| V60 | 2.5–3 min | Clean, bright, crisp | £6–£60 | Single-origin coffee |
| Chemex | 4–7 min | Light, delicate, clear | £47.80+ | Groups, light roasts |
| French Press | 4–5 min | Rich, full-bodied | £29.90+ | Milk-based drinks |
| AeroPress | 1.5–2 min | Smooth, low-acid | £39.99+ | Travel, quick brewing |
| Espresso | 25–30 sec | Intense, concentrated | £119+ | Craftsmanship, versatility |
| Moka Pot | 3–5 min | Bold, rustic, syrupy | £30+ | Affordable strong coffee |
| Cold Brew | 12–24 hrs | Sweet, silky, low-acid | Basic tools | Large batches, iced drinks |
| Clever Dripper | 4–6 min | Balanced, clean finish | ~£20+ | Easy, consistent brewing |
Each method brings out different qualities in your coffee. Start with the one that fits your taste and lifestyle, then experiment to discover new flavours.
Coffee Brewing Methods Comparison: Time, Flavor, Cost & Best Uses
French Press vs AeroPress vs Pour-over and More: Coffee Methods Compared
1. Pour Over (V60)
When it comes to brewing coffee with precision and bringing out the unique qualities of each bean, the Hario V60 is a standout choice. Its name comes from its 60° cone shape, designed to direct water towards the centre of the coffee bed for consistent extraction. The spiral ribs and single large hole give you total control over the brewing process, making it a popular pick for coffee lovers who value precision.
Process and Brew Time
Start by placing a folded paper filter in the V60 and rinsing it with hot water to preheat the setup. Add your ground coffee using a 1:16 ratio - 15g of coffee to 250g of water is a good starting point. Make a small indentation in the coffee bed. Begin with the bloom: pour about double the weight of your coffee in water (around 30g) and wait 30 seconds to let the CO₂ escape. After that, pour the remaining water in slow, steady spirals, starting from the centre and moving outward, but avoid pouring directly onto the filter's edges. The whole process should take 2.5 to 3 minutes. This method ensures the V60 delivers its characteristic flavour clarity.
Flavour Profile
The V60's paper filter removes most of the coffee oils and sediment, resulting in a clean, crisp cup. It highlights bright acidity and draws out citrus, floral, and fruity notes. As James Bellis, Founder of Balance Coffee, puts it:
The V60's paper filter delivers a clarity of flavour that lets origin characteristics totally shine.
Equipment and Resources
To brew with a V60, you'll need a dripper, V-shaped paper filters, a gooseneck kettle, a digital scale, and a burr grinder for a consistent medium-fine grind. Drippers range in price from about £6 for plastic models to £60 for premium copper options. Heat your water to between 90°C and 96°C. Interestingly, many professionals prefer plastic V60s for their ability to maintain steady temperatures.
Ideal Use Cases
The V60 is ideal for savouring coffee in its purest form, especially single-origin beans. If your brew tastes bitter, try a coarser grind. If it comes out sour or weak, adjust to a finer grind for better balance. This method is a great way to experience the full potential of your coffee.
2. Pour Over (Chemex)
The Chemex combines sophistication with functionality, offering a sleek design that can brew up to eight cups at a time. Its thick, bonded filters eliminate most oils and sediment, delivering a cup that's exceptionally clean and crisp. This method is perfect for serving a group while maintaining the precision and control of a manual pour-over.
Process and Brew Time
Brewing with a Chemex is a straightforward yet meticulous process. Start by heating your water to 90°C–96°C. Place the Chemex filter into the vessel with its thicker side against the spout, then rinse it to remove any papery taste and preheat the carafe. Use a medium-coarse grind - think sea salt or raw sugar crystals. Stick to a 1:17 coffee-to-water ratio; for a 500g brew, you'll need about 30g of coffee.
Begin by blooming the coffee: pour twice the coffee's weight in water and let it sit for 30–45 seconds. Then, pour the rest slowly in a spiral motion, starting from the centre and moving outward. The pouring phase should take around 3 minutes, with the total brew time falling between 4 and 7 minutes.
Flavour Profile
The Chemex method rewards your effort with a cup that’s clean, light, and full of clarity. Thanks to its heavy filtration, oils and undissolved solids are removed, allowing delicate flavour notes - like jasmine or strawberry - to stand out. Aimee Bennett from Adams + Russell highlights the precision of this method:
"Extracting coffee via the pour over method is the ideal way for these nuanced flavours to express themselves."
Equipment and Resources
To brew with a Chemex, you'll need a few essentials: the Chemex vessel itself (starting at approximately £47.80), Chemex-specific bonded paper filters, a gooseneck kettle for controlled pouring, a burr grinder, a digital scale, and a timer. If you're brewing a larger batch, opt for a slightly coarser grind to prevent over-extraction and bitterness.
Ideal Use Cases
The Chemex shines when brewing for groups, especially when showcasing the subtle characteristics of lightly roasted specialty coffees or single-origin beans. With sizes available for up to 13 cups, it’s an excellent choice for gatherings, offering a way to share coffee’s more delicate flavour profiles with multiple people at once.
3. French Press (Cafetière)
The French Press, often referred to as a cafetière in the UK, is an immersion brewing method that delivers a bold and full-bodied coffee. Thanks to its metal mesh filter, it retains the coffee’s natural oils and fine particles, resulting in a rich, textured drink. This makes it perfect for milk-based coffees or when brewing several cups at once. Unlike pour-over methods, the French Press fully immerses the coffee grounds, creating a distinctively textured brew.
Process and Brew Time
Start by preheating your French Press with hot water, then discard the water. Add coarsely ground coffee - aim for a texture like breadcrumbs or sea salt - using a ratio of 30g of coffee for every 500ml of water. Heat water to around 93°C (just off the boil), pour it over the grounds to ensure they’re fully saturated, and then place the lid on without plunging. Let it steep for 4 minutes, then press the plunger down slowly and pour the coffee immediately to avoid over-extraction.
For a cleaner cup, you can try a slightly different approach: steep for 5 minutes, stir to break the crust on top, wait an additional 5 minutes, and then plunge only partially. This technique helps reduce sediment in your cup.
Flavour Profile
The French Press delivers a strong, full-bodied coffee with a heavy texture, thanks to the preserved oils. While some sediment is inevitable, refining your brewing technique can minimise it. The coffee’s depth and richness make it an excellent choice for pairing with milk or cream.
Equipment and Resources
Having the right tools is essential for a good French Press brew. You’ll need:
- A French Press (e.g., a 3-cup Bodum, which costs around £29.90)
- A kettle
- A timer
- A stirrer
- A burr grinder for consistent grounds
- A kitchen scale for precise measurements
Heat your water to 93°C (about 30 seconds after boiling) and leave about 1cm of liquid at the bottom of the French Press when pouring to reduce sediment. If you prefer glass models, they offer clarity, while stainless steel versions retain heat better.
Ideal Use Cases
The French Press is a great choice if you enjoy a rich, robust coffee that works well with milk or cream. It’s also an excellent option for brewing multiple servings in one go.
4. AeroPress
The AeroPress, created by Alan Adler in 2005, is a compact coffee maker that blends multiple brewing methods into one handy device. With over 75,000 five-star reviews across 70 countries, it’s no surprise that coffee enthusiasts love its ability to produce a rich, smooth, and balanced cup. Using air pressure, it pushes water through coffee grounds, creating a hybrid brewing experience that’s both unique and effective. Here’s how it works and what you can expect.
Process and Brew Time
Start by placing a paper filter in the cap and rinsing it with hot water to eliminate any papery taste. Add around 18g of finely ground coffee (similar in texture to table salt) into the chamber. Then, pour 55–65ml of water heated to 94°C over the grounds and stir gently. Insert the plunger to seal the chamber and let it steep for 45 seconds. When ready, press down slowly for about 30 seconds, stopping when you hear a hissing sound to prevent over-extraction. The entire process takes around 75 seconds for an espresso-style concentrate. If you prefer a longer, filter-style brew, you can use the inverted method, which takes up to 2 minutes.
Flavour Profile
The AeroPress delivers a clean and smooth cup with very little bitterness. Its paper micro-filters catch fine sediments and bitter oils, ensuring a crisp flavour. The air pressure speeds up the brewing process, reducing the acidity that often comes with longer steeping times. You can enjoy a concentrated, espresso-like shot or add hot water to create a lighter, tea-like brew. With manual pressure of about 3 bars, the AeroPress produces a balanced, medium-bodied coffee.
Equipment and Resources
To get started, you’ll need an AeroPress. Prices range from £39.99 for the Clear model to £199.95 for the Premium version, which features glass and metal components. You’ll also need paper filters (around £7.99 per pack) or a reusable metal filter (approximately £15.99) if you prefer a fuller-bodied brew. Other essentials include a stirrer, a sturdy mug, a digital scale, a timer, and a temperature-controlled kettle. It’s worth noting that you should always press into a durable mug, as the pressure can crack fragile glassware.
Ideal Use Cases
The AeroPress is perfect for travel or office use, thanks to its durable and compact design. Cleanup is a breeze - the plunger not only pushes out the used coffee grounds but also wipes the chamber clean in the process. Whether you’re experimenting with brewing techniques or just need a quick, delicious cup, the AeroPress consistently delivers satisfying results.
5. Espresso
Espresso is the gold standard for concentrated coffee, crafted in just 25–30 seconds under 9 bars of pressure. This process produces a rich, syrupy shot crowned with a layer of crema. Known for its bold and full-bodied character, espresso serves as the backbone for popular drinks like lattes, cappuccinos, and flat whites.
Process and Brew Time
To get started, preheat your espresso machine and flush the group head with boiling water. Grind 18–20g of coffee to a fine consistency, resembling powdered sugar, and dose it evenly into the portafilter. Distribute the grounds uniformly and tamp them firmly to create a compact puck. Once the portafilter is locked in place, start your timer and begin the extraction. For the first 3–5 seconds, the coffee should drip slowly before transitioning into a steady, honey-like stream. The goal is a 1:2 ratio - 18–20g of coffee yielding 36–40g of liquid espresso - within 25–30 seconds. If the shot tastes sour, adjust to a finer grind; if it’s bitter, try a coarser grind.
Flavour Profile
Espresso delivers an intense flavour experience, balancing sweetness, acidity, and bitterness. Its signature crema adds a velvety texture that enhances the overall taste.
Equipment and Resources
To make espresso at home, you'll need an espresso machine. Entry-level models start at around £119, while mid-range machines average £283. A burr grinder capable of producing a very fine grind is essential. Other must-haves include a portafilter, basket, tamper, digital scale (accurate to 0.1g), and a timer. For milk-based drinks, consider a machine with a built-in steam wand and a stainless steel milk pitcher. Over five years, making two espressos daily costs about £802.
For the best results, always use fresh beans within a couple of weeks of roasting. Store them in an airtight container in a cool, dark spot, and grind them just before brewing. This attention to detail reflects the blend of craft and precision that defines Creation Coffee's approach.
Ideal Use Cases
Espresso is perfect for those who value craftsmanship, control, and versatility. While it requires more skill and upkeep compared to pod systems, traditional espresso machines offer unparalleled flavour customisation and lower long-term costs. As James Freeman, founder of Blue Bottle Coffee, once said:
If you buy good coffee and want to prepare it well, you have to choose a method that lets you express your dedication, skill, and enthusiasm.
sbb-itb-cca2aed
6. Moka Pot
The Moka pot, a stovetop espresso maker, is a simple yet effective way to brew a rich, concentrated coffee in just 3–5 minutes. Operating at around 1.5 bars of pressure, it bridges the gap between filter coffee and true espresso, offering a bold flavour without the cost or complexity of an espresso machine. In the UK, ownership of Moka pots has grown from 7% in 2018 to an expected 12% by 2026, with 38% of owners using theirs at least three times a week. As with other brewing methods, controlling water temperature and timing is essential for achieving the best flavour.
Process and Brew Time
Start by boiling water and filling the lower chamber of the Moka pot just below the safety valve with water heated to 92–96°C. This helps prevent the metal from overheating, which could "cook" the coffee grounds. Grind your coffee to a medium-fine consistency, similar to table salt, and fill the filter basket level to the top. Avoid tamping or compressing the grounds - this can lead to over-extraction and dangerous pressure build-up. Secure the top chamber tightly and place the pot on medium-low heat. Keep an eye out for a steady, honey-coloured stream of coffee; as soon as you hear sputtering or hissing, remove the pot from the heat to avoid harsh flavours. To halt the brewing process immediately, run the base under cold water.
Flavour Profile
The Moka pot produces a bold, concentrated coffee with a syrupy texture and low acidity. Since it doesn’t use a paper filter, you’ll notice some fine sediment in your cup, similar to a French press, giving the brew a textured, rustic quality. As Seven Sisters Coffee describes:
Think of moka pot coffee as espresso's powerful, rustic cousin. It delivers a similar intensity and depth of flavour but with its own unique character and texture.
Equipment and Maintenance
To get started, you’ll need a Moka pot (available in 1, 3, or 6-cup sizes), a kettle, and a heat source. For the best results, use a burr grinder for freshly ground coffee and digital scales for precise measurements. Filtered water is recommended to prevent mineral build-up and maintain clean, consistent flavours. After brewing, rinse all parts with warm water - avoid harsh detergents or abrasive materials like steel wool, especially on aluminium pots, to preserve the natural coffee oil patina.
Ideal Use Cases
The Moka pot is perfect for those who enjoy strong coffee or milk-based drinks but don’t want to invest in an espresso machine. Its portability makes it a favourite for camping trips, and it’s easy to use once you’ve mastered the basics. If your coffee tastes overly bitter, your grind might be too fine; if it’s sour or watery, try a coarser grind.
7. Cold Brew
Cold brew is a brewing method that involves steeping coarsely ground coffee in cold water for 12 to 24 hours. This slow process creates a smooth, concentrated coffee with low acidity, setting it apart from iced coffee, which is brewed hot and then chilled over ice. By using cold water from the start, cold brew avoids extracting the bitter compounds that hot water can draw out, resulting in a naturally sweeter and more chocolatey flavour. The texture is rich and full-bodied, though it lacks the aromatic clarity found in methods like pour-over brewing.
Process and Brew Time
To make cold brew, start with a very coarse grind - similar to breadcrumbs or sea salt - to prevent over-extraction during the extended steeping time. Combine the coarsely ground coffee with cold, filtered water at a 1:8 ratio (for example, 125g of coffee per litre of water). Stir to ensure the grounds are fully saturated, cover the mixture, and let it steep in the refrigerator for 12 to 24 hours. Once steeped, strain the liquid through a fine-mesh sieve and then filter it again using either a paper filter or a muslin cloth. The resulting concentrate can be stored in a sealed container in the fridge and remains fresh for 7 days to a month.
Flavour Profile
Cold brew delivers a crisp, silky coffee with a pronounced sweetness and minimal acidity. This gentle brewing technique avoids the astringent compounds that hot water often extracts, giving it a smooth, chocolate-like taste. Before serving, dilute the concentrate - typically about 30ml of concentrate to 120ml of water or milk. If you prefer a warmer drink but want to maintain the low acidity, you can mix the concentrate with hot water.
Equipment and Resources
Making cold brew at home doesn’t require any fancy equipment. A mason jar, French press, or even a simple bowl with a lid will do the job. For filtering, paper filters provide the cleanest results, while cheesecloth or muslin allows some oils through, creating a textured, French press–like cup. A burr grinder set to the coarsest setting ensures consistent results, and filtered water is essential for a clean, pure taste. To avoid any risk of bacterial growth, make sure all equipment is cleaned and sterilised thoroughly.
Ideal Use Cases
Cold brew is perfect for making large batches to enjoy throughout the week or to share with friends at gatherings. It’s also a great way to use coffee beans that are past their peak freshness - typically around three weeks old - which might not shine in more delicate brewing methods but work beautifully in cold brew. The concentrate is versatile and serves as an excellent base for iced lattes, coffee mocktails, or even espresso martinis. If your cold brew tastes too bitter, try using a coarser grind or reducing the steeping time. On the other hand, if it tastes sour, a slightly finer grind or a longer steep may help balance the flavours.
8. Clever Dripper
The Clever Dripper is a brewing device that merges the immersion and filter methods into one simple tool. At first glance, it resembles a typical pour-over dripper, but its standout feature is a valve at the bottom. This valve allows the coffee grounds to steep fully in water before filtering, giving you the richness of immersion brewing combined with the clean finish of paper filtration. It’s a great option for anyone who values consistency without needing to master the precise pouring techniques required by traditional pour-over methods. Think of it as a middle ground between the V60 and French Press, offering a distinct and effective brewing experience.
Process and Brew Time
To brew with the Clever Dripper, start with a medium-coarse grind. Place a paper filter inside the dripper and rinse it to remove any papery taste. Add your coffee grounds, then pour hot water (around 93°C) over them, ensuring all the grounds are evenly saturated. Allow the coffee to steep for 2 to 4 minutes. When ready, place the dripper on your cup or carafe, which automatically opens the valve, letting the brewed coffee flow through the filter. The entire process, from start to finish, takes about 4 to 6 minutes.
Flavour Profile
The Clever Dripper produces a balanced cup of coffee, offering a satisfying middle ground between the bold texture of a French Press and the bright, intricate notes of a V60. Thanks to the paper filter, the oils and fine sediment that often accompany metal filters are kept out, resulting in a cleaner finish. The immersion step ensures a thorough extraction, enhancing the coffee’s natural sweetness and body, while the filtration removes any muddiness. The result is a cup that highlights the coffee’s flavours without bitterness or harshness, making it approachable for all palates.
Equipment and Resources
To get started, you’ll need a Clever Dripper, paper filters, a burr grinder, and freshly roasted coffee beans. Using filtered water is key to achieving a pure and clean taste. The Clever Dripper is easy to use and doesn’t demand the precision of manual pour-over techniques, making it ideal for anyone who wants high-quality coffee with minimal effort.
Ideal Use Cases
The Clever Dripper is a fantastic choice for those who want consistent and hassle-free brewing. It’s perfect for busy mornings when you need a great cup without worrying about perfecting your pouring technique. It’s also a forgiving method for exploring different coffee beans and origins, as the immersion process ensures even extraction and the paper filter keeps the flavours clean and well-defined. Whether you’re a beginner or a seasoned coffee enthusiast, the Clever Dripper is a reliable and straightforward way to enjoy a delicious brew.
Advantages and Disadvantages
Every brewing method brings its own set of perks and challenges, making the choice highly personal.
The V60 gives you precise control over brewing variables, resulting in a clean, vibrant cup that highlights the coffee’s origin. However, it requires a steady hand, some practice, and a gooseneck kettle to get it just right.
The Chemex is known for its ability to produce clear, sediment-free coffee with a delicate, tea-like quality - thanks to its thick paper filters. On the downside, its glass body is fragile, and it comes with a heftier price tag, typically around £40–£45.
The French Press is all about simplicity. It delivers a rich, full-bodied coffee, preserving the natural oils, though it may leave a bit of sediment in your cup.
The AeroPress stands out for its versatility and portability. It brews smooth, low-acid coffee quickly and is easy to clean, though it’s generally designed for single servings.
Espresso creates a concentrated, intense shot with a luxurious crema. But achieving this requires expensive equipment (ranging from £50 to £1,500) and a lot of precision with grinding and tamping.
The Moka Pot offers a budget-friendly (around £30) and durable way to make strong coffee without needing an espresso machine. However, managing heat carefully is key to avoiding bitterness.
Cold Brew is incredibly easy to prepare and produces a mellow, low-acidity concentrate. The trade-off? It takes patience, as the steeping process can take anywhere from 12 to 24 hours.
The Clever Dripper blends immersion and filtration for a balanced flavour profile. It’s straightforward to use and doesn’t demand much technical skill, making it a great option for hassle-free brewing.
When thinking beyond flavour, the environmental impact is worth considering. The French Press and Moka Pot are eco-friendly, as they use permanent metal filters, generating minimal waste. In contrast, methods like the V60 and AeroPress rely on disposable paper filters (£4–£5 per pack). Espresso machines, while effective, can be energy-intensive, taking anywhere from 5 to 45 minutes to heat up, whereas manual methods only require hot water.
Ultimately, your choice might come down to your priorities: speed (AeroPress, espresso), ease of use (French Press, Clever Dripper), clarity of flavour (V60, Chemex), strength (espresso, Moka Pot), or sustainability (French Press, Moka Pot). There’s no universal “best” method - just the one that fits your taste and lifestyle best.
Conclusion
This article explored eight brewing techniques, weighing them against factors like flavour, convenience, and sustainability. The best brewing method? It depends entirely on your coffee preferences and daily routine. If bold, intense flavours are your goal, espresso delivers a concentrated punch, while the Moka Pot offers a similarly robust experience for about £30. On the other hand, if speed and ease are non-negotiable, the AeroPress shines with its under-two-minute brew time and simple cleanup - perfect for hectic mornings or travel.
Sustainability is another key consideration. For eco-conscious coffee lovers or those brewing multiple cups, the French Press is a standout choice. It avoids disposable filters and is built to last. Similarly, the Moka Pot scores points for its longevity, and the Chemex is excellent for brewing larger batches without compromising on sustainability. If you’re intrigued by the delicate, floral, or fruity notes of light-roast beans, pour-over methods like the V60 or Chemex are ideal for highlighting those subtle characteristics.
"Choosing the right brewing method unlocks the nuanced flavours of your coffee beans." – Seven Sisters Coffee
Trying out different methods can be a fun way to discover how your favourite beans transform across brewing styles. For instance, a single-origin coffee might reveal bright, fruity notes in a V60, while the same beans could taste rich and chocolatey in a French Press. Start with a method that fits your lifestyle, then experiment to uncover new flavour profiles.
At the end of the day, the best brewing method is the one that matches your taste, priorities, and daily habits. And remember, great coffee starts with great beans. Opt for freshly roasted, ethically sourced coffee to elevate every cup.
FAQs
What is the easiest coffee brewing method for beginners?
For those just starting out, the pour-over method is a fantastic introduction to coffee brewing. It’s straightforward and only requires a dripper, filter, ground coffee, and hot water. This method not only delivers a clean and flavourful cup but also helps beginners grasp essential brewing elements like water temperature and pouring technique. It’s a hands-on way to build confidence and refine your coffee-making skills.
Another great option for beginners is the French press. This method is incredibly simple and needs very little equipment - just coffee, hot water, and the press itself. After a few minutes of steeping, you press the plunger down, and your coffee is ready. Both approaches are easy to pick up and produce excellent results, though the pour-over method is often favoured by those keen to explore the subtle complexities of coffee flavours.
How do different brewing methods impact the taste of coffee?
The way you brew your coffee plays a huge role in shaping its flavour, as each method extracts unique compounds and oils from the beans. Take pour-over methods like the Chemex or Hario V60, for example - they produce a clean, crisp cup by filtering out oils and sediment, which allows the more delicate notes to shine. Then there’s the French press (or cafetière), which keeps more oils and fine particles in the mix, giving you a richer, fuller-bodied coffee.
Other factors like water temperature, brewing time, grind size, and pressure also have a big impact on the final taste. For instance, espresso is made using high pressure and finely ground coffee, resulting in a bold, concentrated shot with a layer of crema on top. Meanwhile, cold brew takes its time, steeping coffee grounds in cold water for hours. The result? A smoother, naturally sweeter drink with lower acidity. By choosing the right brewing method, you can customise the flavour to suit your preferences, making it a key step in your coffee-making ritual.
What basic equipment do I need to start brewing coffee at home?
To start brewing coffee at home, you'll need a few essential items based on your preferred method. For pour-over, you'll require a dripper (such as a Hario V60 or Chemex), paper filters, and a kettle designed for controlled pouring. If a French press is more your style, a cafetière, coarsely ground coffee, and hot water are the main tools. For those who enjoy espresso, you'll need an espresso machine, a portafilter, and finely ground coffee.
A coffee grinder is a must-have for achieving the ideal grind size for your brewing method, as freshly ground coffee can significantly improve the flavour. Make sure you have a dependable source of hot water, ideally heated to 90–96°C, for the best brewing results. With these basics, you're all set to make delicious coffee at home, just the way you like it.