
Brewing great coffee at home doesn’t require expensive equipment. The secret lies in high-quality beans, precise measurements, and the right tools. Here’s a quick guide to elevate your coffee game:
- Beans: Always opt for whole beans with a "roasted-on" date. Use them within 4–6 weeks for the best flavour. Single-origin beans highlight unique flavours, while blends offer consistency.
- Grind Size: Match the grind to your brewing method (e.g., coarse for French press, medium-fine for pour-over, fine for espresso).
- Water Temperature: Keep it between 90°C and 96°C for balanced extraction.
- Equipment: Invest in a burr grinder, digital scale, and gooseneck kettle for precision.
- Ratios: Use 60g of coffee per litre of water as a starting point.
Choose between pour-over for a clean, bright cup or French press for a bold, full-bodied brew. Ethical sourcing and proper storage also play a key role in crafting a satisfying coffee experience.
Home Coffee Brewing 101: Methods, Equipment, and Tips for the Perfect Cup
sbb-itb-cca2aed
Selecting High-Quality Specialty Coffee Beans
When it comes to brewing exceptional coffee, the quality of your beans matters far more than the price tag on your equipment. Coffee experts agree that even the most advanced espresso machine can't work its magic without top-notch beans. Fresh, high-quality coffee is the foundation of great flavour.
Understanding Coffee Bean Types
Coffee beans come in two main categories: single-origin and blends. Single-origin beans are sourced from a specific region or farm, showcasing the unique flavours of that location. For example, Ethiopian beans are often known for their fruity, floral notes, while Brazilian beans tend to have rich chocolate and nutty tones.
Blends, on the other hand, combine beans from different regions to create a well-rounded and consistent flavour profile. Your choice between single-origin and blends should align with your brewing method. Lighter roasts, for instance, are ideal for pour-over brewing, while darker roasts pair beautifully with milk-based drinks like lattes or cappuccinos.
Looking for ethically sourced options? Creation Coffee offers hand-roasted selections in both single-origin and blend varieties, ensuring there’s something for every coffee enthusiast.
The Importance of Freshness
Freshness is the secret ingredient to unlocking the best flavours in your coffee. Freshly roasted beans are at their peak flavour for up to 60 days, but once ground, coffee loses its freshness 20 times faster than whole beans. To ensure you're brewing with the best, always look for a "roasted-on" date rather than a generic "best before" label. Ideally, use your beans within 4–6 weeks of roasting.
Creation Coffee makes it easy to enjoy fresh coffee with their subscription service, which delivers beans within their optimal freshness window - typically 5–12 days after roasting. For storage, keep your beans in an airtight, opaque container in a cool, dry spot. Avoid storing them in the fridge or freezer, as moisture and temperature changes can compromise the flavour.
Equipment and Tools You'll Need
Pour-Over vs French Press Coffee Brewing Methods Comparison
Making exceptional coffee at home doesn’t require a professional barista’s setup, but having the right tools can transform your brewing experience. The most crucial item? A burr grinder. Unlike blade grinders, which hack beans into uneven pieces, a burr grinder ensures consistent grounds, leading to a more balanced extraction. As Niche Coffee explains:
A good quality grinder that allows accurate control of the grind size is the most important piece of equipment in your brewing setup.
Even an entry-level burr grinder will outperform pre-ground coffee, delivering a fresher, more flavourful cup every time.
A digital scale is another must-have. It helps you nail the coffee-to-water ratio (typically 60g of coffee per litre of water) and ensures your brewing process is consistent and repeatable . If you’re a fan of pour-over brewing, a gooseneck kettle is indispensable. Its long, narrow spout allows for a controlled, steady pour, ensuring even saturation of the coffee grounds. Temperature-controlled models, like the Fellow Stagg EKG (priced around £180–£200), make it easy to heat water to the ideal brewing range of 90.5°C to 96°C.
If your kettle doesn’t have a built-in thermometer, consider getting a standalone thermometer to monitor water temperature. You’ll also need a pour-over dripper (like the V60 or Kalita Wave) or a French press, depending on your preferred brewing style. Don’t forget to rinse paper filters with hot water to eliminate any papery taste and preheat your brewing vessel for optimal results. Below is a quick rundown of the essential tools for perfecting your home brew.
Must-Have Equipment for Home Brewing
- Burr grinder – for consistent grind size and better extraction
- Digital scale – to precisely measure coffee and water in grammes
- Gooseneck kettle – for controlled and even pouring
- Thermometer – to maintain the ideal water temperature (if your kettle lacks this feature)
- Pour-over dripper or French press – tailored to your flavour preferences
- Filtered water – especially important in hard water areas to avoid mineral buildup
Pour-Over vs French Press
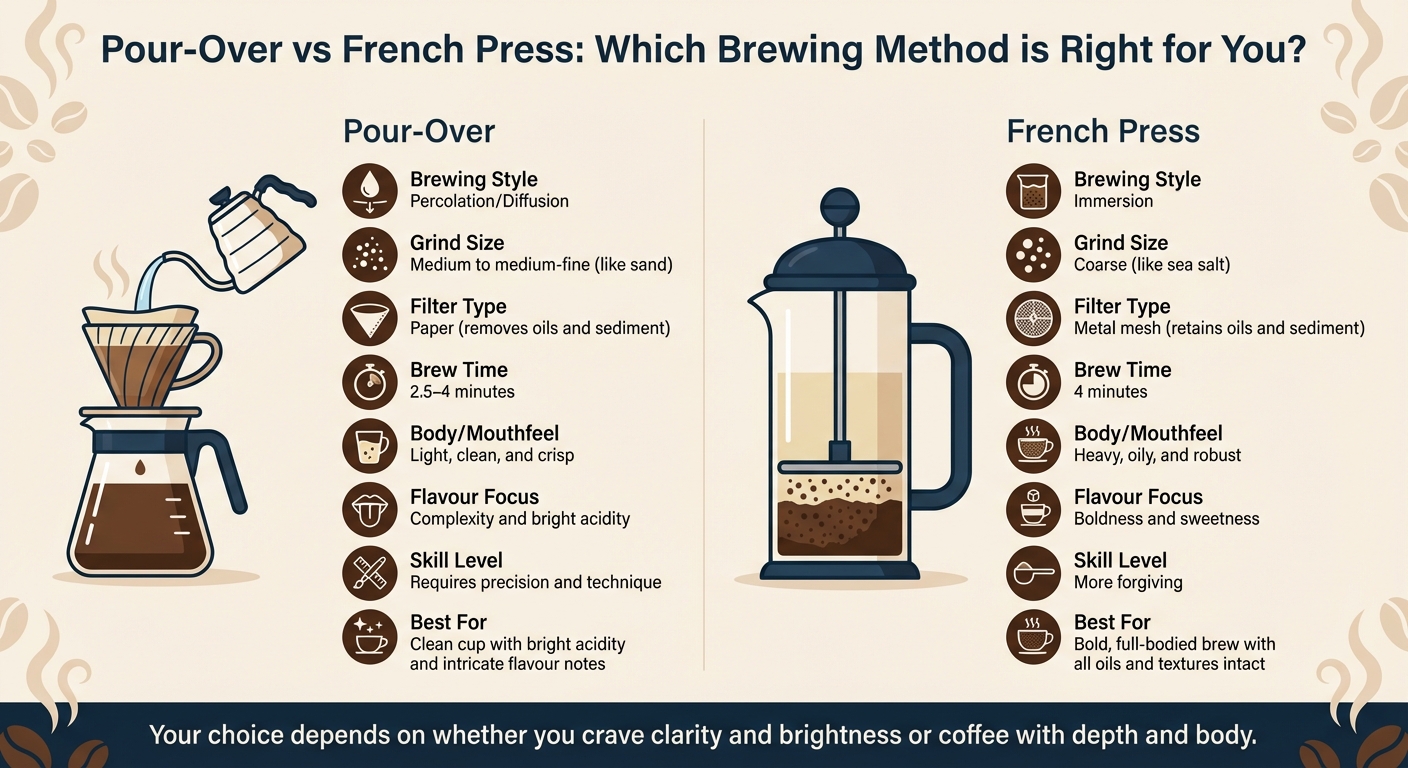
Once you’ve gathered your equipment, it’s time to decide on your brewing method. Both pour-over and French press techniques can produce excellent coffee, but the results differ significantly. Pour-over is a percolation method where water flows steadily through the coffee grounds and a paper filter. The result? A clean cup with bright acidity and intricate flavour notes. The French press, on the other hand, uses an immersion method. Coffee grounds steep in water for about four minutes before being separated by a metal mesh filter, creating a bold, full-bodied brew with all the oils and textures intact.
| Feature | Pour-Over (e.g., V60, Kalita) | French Press (Cafetière) |
|---|---|---|
| Brewing Style | Percolation / Diffusion | Immersion |
| Grind Size | Medium to medium-fine (like sand) | Coarse (like sea salt) |
| Filter Type | Paper (removes oils and sediment) | Metal mesh (retains oils and sediment) |
| Brew Time | 2.5–4 minutes | 4 minutes |
| Body/Mouthfeel | Light, clean, and crisp | Heavy, oily, and robust |
| Flavour Focus | Complexity and bright acidity | Boldness and sweetness |
| Skill Level | Requires precision and technique | More forgiving |
Pour-over offers a lighter, tea-like experience with nuanced flavours, but it demands precision and technique. The French press, while more forgiving, delivers a richer, bolder cup. Your choice ultimately depends on whether you crave clarity and brightness or a coffee with depth and body.
Understanding Grind Size, Water Temperature, and Ratios
After selecting your brewing method, three key factors come into play: grind size, water temperature, and the coffee-to-water ratio. These variables are what separate a coffee that’s full of flavour from one that’s flat or overly bitter. Getting these right can make all the difference.
Choosing the Right Grind Size
Grind size determines how quickly water extracts flavour from your coffee grounds. Smaller particles mean faster extraction, as they have more surface area, while larger particles slow things down. If your grind is too coarse, you might end up with an under-extracted cup that tastes weak, sour, or overly acidic. On the other hand, grinding too fine can cause over-extraction, leading to harsh bitterness.
For specific brewing methods:
- French press: Use a coarse grind, similar to sea salt.
- Pour-over (e.g., V60): Opt for a medium to medium-fine grind, resembling table salt or sand.
- Espresso: Go for an extra-fine grind, almost like icing sugar.
If your coffee tastes bitter, try a coarser grind. If it’s too sour, adjust to a finer grind. Consistency is key - uneven grind sizes can cause inconsistent extraction and muddled flavours. That’s why a burr grinder is highly recommended for precision.
Using the Right Water Temperature
Water temperature has a direct impact on how quickly flavours are extracted and how balanced your coffee tastes. The sweet spot is between 90°C and 96°C. Water hotter than 96°C can scorch the grounds, resulting in astringent, smoky, or bitter flavours. On the other hand, water cooler than 90°C might not extract enough sweetness or acidity, leaving your coffee thin and grassy.
If you don’t have a temperature-controlled kettle, let boiling water cool for 30 to 60 seconds before pouring. Keep in mind that pouring water typically causes a 5°C to 10°C drop in temperature. For light roasts, aim closer to 96°C to highlight their natural sweetness. For darker roasts, stick around 90–92°C to avoid drawing out overly harsh notes.
Once your grind size and temperature are sorted, it’s time to focus on the coffee-to-water ratio.
Brewing Ratios for Consistency
The coffee-to-water ratio is the final piece of the puzzle, determining the strength and balance of your brew. For filter coffee, the industry standard ratio is 1:16 - that’s about 15 grammes of coffee to 240 millilitres of water. French press recipes usually range from 1:12 to 1:16, with 1:15 (e.g., 30 grammes of coffee to 500 millilitres of water) being a good starting point. Espresso takes a more concentrated approach, typically following a 1:2 ratio - for example, 20 grammes of coffee yielding 40 grammes of liquid.
Using a digital scale to measure both coffee and water by weight ensures accuracy and consistency. Since 1 millilitre of water weighs exactly 1 gramme, precise measurements become much easier. Start with the 1:16 ratio and adjust as needed: use less water for a stronger brew or more for a lighter cup.
Step-by-Step Brewing Methods
Now that you've nailed down your grind size, water temperature, and ratios, it’s time to put those skills to work. Each brewing method has its own quirks, but the goal is always the same: to coax the best flavours out of your coffee beans. Here’s how to master three popular brewing techniques at home.
Pour-Over Technique
Start with your chosen grind size and water temperature. Place a paper filter in your dripper and rinse it thoroughly with hot water - this step gets rid of any papery taste and warms up your brewing vessel. Measure out 15 grammes of coffee and grind it to a medium or medium-fine consistency, like coarse sand or sea salt. Add the grounds to the filter, then give the dripper a gentle shake to level the coffee bed.
Heat your water to 93°C (ideal for medium roasts). Begin with the bloom: pour about 30 millilitres of water over the grounds in a slow, circular motion, starting in the centre and spiralling outward. Let it sit for 30 to 60 seconds as the coffee bubbles and expands, releasing trapped carbon dioxide.
After blooming, continue pouring in a controlled, steady spiral using a gooseneck kettle. Keep the stream thin and avoid disrupting the grounds too much. Add water in stages until you’ve poured a total of 240 millilitres, maintaining a smooth flow throughout. The whole process should take between 2.5 and 4 minutes. When done, the coffee bed should be flat - a sign of even extraction.
"A well-prepared pour-over coffee is a thing of beauty that can change your entire perspective on coffee." - Julia Bobak, Coffee Specialist, Home Grounds
Once you've mastered this method, try experimenting with another brewing style to explore different flavour profiles.
French Press Technique
Begin by preheating your French press. Rinse it with hot water, then discard the water. Weigh out 20 grammes of coarsely ground coffee (similar in texture to sea salt). Add the grounds to the press.
Heat your water to between 90.5°C and 96°C. Pour about 60 millilitres (roughly 20% of the total water) over the grounds to let them bloom for 30 seconds. Then, add the remaining water to reach a total of 300 millilitres. Place the lid on top with the plunger fully raised, but don’t press yet. Let the coffee steep undisturbed for 4 minutes.
When the time is up, press the plunger down slowly and steadily, stopping just before the mesh reaches the settled grounds to avoid stirring up sediment. Pour all the coffee out immediately into your cup or a carafe to prevent over-extraction, which can lead to bitterness.
"Always pour the coffee out of the press pot immediately after pressing so the coffee does not continue to extract." - Stephen T Robertson
For a more concentrated and intense experience, give the espresso method a shot.
Espresso Technique (Home Machine)
Espresso requires precision, so let your machine preheat for 15 to 30 minutes to ensure temperature consistency. Run a blank shot (just water) through the group head to flush the system and warm up the portafilter. Preheat your espresso cups to around 45°C, either by placing them on the machine or rinsing them with hot water.
Weigh out 18 grammes of coffee and grind it to a fine texture, similar to icing sugar or flour. Dose the coffee into the portafilter, distribute it evenly, and tamp firmly to create a level puck. Lock the portafilter into the group head and place your preheated cup underneath.
Start the extraction immediately, aiming for a 1:2 brew ratio - 18 grammes of coffee should yield 36 grammes of liquid espresso in 25 to 30 seconds. The flow should look like runny honey, starting dark and gradually lightening to a pale blonde crema. If the shot finishes too quickly (under 25 seconds), adjust the grind finer. If it takes longer (over 30 seconds), go coarser.
"Baristas consider 25 seconds to be the sweet spot for pulling an espresso shot delivering the best results." - John Farrer & Co (Kendal) Ltd
A perfect crema should have a hazelnut colour and be thick enough to briefly hold sugar on its surface before it sinks. Serve immediately and enjoy the rich, full-bodied espresso you've crafted with care.
Tips for Ethical and Responsible Brewing
Making a great cup of coffee at home isn’t just about mastering the brewing process - it’s also about making choices that care for the planet and the people behind your coffee beans. From how you store your beans to the equipment you use, small changes can make a big difference. Let’s start with how to keep your coffee fresh.
Storing Your Coffee Beans
Keeping your coffee beans fresh is key to reducing waste and enjoying their best flavour. Store your beans in an opaque, airtight container and place it in a cool, dark cupboard, away from heat or sunlight. Whole beans stay fresher longer than pre-ground coffee, so consider grinding your beans just before brewing.
"Air, heat, light, and water are not kind to fresh coffee beans, so avoid exposing them to these elements wherever possible." - Natalie Bass, Journalist, BBC Good Food
It’s also smart to buy coffee in smaller, more frequent batches instead of large bags. Check for a "roasted-on" date rather than a "best before" date, as coffee typically tastes best 3 to 6 weeks after roasting. And while it might seem like a good idea, storing beans in the fridge isn’t recommended - moisture and fluctuating temperatures can harm their flavour.
Minimising Waste in Brewing
Reducing waste during brewing is easier than you might think. Switching to reusable metal filters can cut down on single-use paper waste while also allowing the coffee’s natural oils to shine through, enhancing its flavour. If you prefer paper filters, don’t toss them in the bin - both the filters and used coffee grounds are compostable.
Investing in durable brewing equipment, like a manual coffee press, can also make a difference. With proper care, a coffee press can last 4 to 5 years even with daily use. To avoid wasting coffee, use a digital scale to measure your beans and water precisely. This not only reduces waste but ensures a consistently great cup every time.
These small steps naturally lead to a bigger commitment - supporting ethical coffee practices.
Supporting Ethical Coffee Practices
When you choose ethically sourced coffee, you’re supporting farmers and communities who work hard to grow your beans. For example, Creation Coffee donates 10% of its profits to a children’s charity and sources beans through direct trade, ensuring fair pay and treatment for growers. By buying from roasters who prioritise ethical practices, you’re contributing to a more sustainable coffee industry.
Look for brands that provide clear sourcing information. Roasters who establish direct relationships with farmers often pay above Fair Trade prices and invest in long-term partnerships. By choosing whole beans from ethical sources and storing them correctly, you’re helping to promote responsible farming and reducing waste at every stage of your coffee journey.
Conclusion
Brewing the perfect cup of coffee comes down to three essentials: fresh, high-quality beans, the right equipment, and precise technique. As David's Beans wisely notes:
Fresh beans matter more than fancy gear.
Start with freshly roasted whole beans and stick to precise measurements. A standard ratio of 60g of coffee per litre of water is a reliable starting point for consistency.
When it comes to equipment, choose tools that suit your brewing style. A burr grinder is the most worthwhile investment you can make. As Niche Coffee explains:
A good quality grinder that allows accurate control of the grind size is the most important piece of equipment in your brewing setup.
Whether you're working with a simple £20 pour-over kit or a high-end £350 espresso machine, two factors remain constant: a uniform grind and water heated to the ideal temperature range of 90.5–96°C. Pairing the right technique with conscious choices can elevate every cup.
Speaking of conscious choices, ethical sourcing adds a meaningful layer to your coffee experience. Supporting ethically sourced beans not only benefits farming communities but also ensures superior flavour. Creation Coffee, for instance, hand-roasts beans in small batches to preserve their unique characteristics. Their direct trade partnerships guarantee farmers are fairly compensated, and their subscription service ensures you receive beans just days after roasting - keeping your coffee as fresh and flavourful as possible.
Want to refine your brewing skills? Check out Creation Coffee's Ultimate Brew Guide for expert tips, or subscribe to have ethically sourced, freshly roasted beans delivered to your door. With the right beans, tools, and know-how, every cup can be extraordinary.
FAQs
What’s the best way to keep coffee beans fresh at home?
To keep your coffee beans fresh and full of flavour, store them in an airtight, opaque container - a ceramic or stainless-steel canister with a one-way valve works perfectly. Find a cool, dry place to keep the container, away from sunlight, heat, and humidity. Steer clear of the fridge, as temperature shifts and moisture can make your beans lose their freshness faster.
For longer-term storage, freezing is a good option. Divide your beans into small, resealable bags, squeeze out as much air as possible, and freeze them. When you're ready to use them, allow the beans to return to room temperature before opening the bag to prevent condensation from forming.
It's best to buy only the amount of coffee you'll use within a couple of weeks. Once you bring your beans home, transfer them from the original packaging into your sealed container. And for that fresh, café-like taste, grind just the amount you need right before brewing. These simple steps will help you enjoy better-tasting coffee at home for longer.
What’s the difference between single-origin and blended coffee beans?
Single-origin coffee beans come from a single farm, region, or country, capturing the essence of that specific location. Factors like the local climate, soil, and processing techniques shape the beans' flavour, often resulting in unique profiles. You might notice fruity or floral notes that can shift with each harvest season, making every cup a bit of an adventure.
Blended coffee, on the other hand, is a mix of beans from different origins. These blends are thoughtfully created to achieve a balanced and consistent flavour. By combining beans with complementary traits - like acidity, sweetness, and body - blends offer a reliable taste that's perfect for various brewing methods or pairing with milk and sugar.
Essentially, single-origin coffee celebrates the individuality of one place, while blends focus on creating a harmonious and dependable flavour experience.
Why is using a burr grinder important for making great coffee at home?
A burr grinder plays a key role in producing evenly ground coffee, which is essential for getting the best flavour out of every brew. Unlike blade grinders that hack beans into uneven pieces, burr grinders crush them into consistent particles. This uniformity ensures a better, more balanced extraction during brewing.
With this level of consistency, you gain greater control over your brewing process, whether you're making coffee with a French press, an espresso machine, or a pour-over setup. Adding a burr grinder to your coffee routine can transform your home brewing experience, helping you enjoy the full potential of your beans.