


If you want better moka pot coffee, start at 1:7 to 1:10 by weight. In plain terms, that means using 1 gram of coffee for every 7 to 10 grams of water, with most people landing near 1:8.
Here’s the short version:
- I fill the water chamber to just below the safety valve
- I fill the basket level to the top
- I never tamp the grounds
- I use grams, not scoops, for more even results
- I treat moka pot “cups” as small servings: a 3-cup pot makes about 150–180 ml, not three mugs
Your starting point will usually look like this:
- 1-cup pot: about 7 g coffee / 50 g water
- 3-cup pot: about 18 g coffee / 150 g water
- 6-cup pot: about 36 g coffee / 300 g water
- 9-cup pot: about 54 g coffee / 450 g water
A tighter ratio such as 1:7 gives a stronger cup. A looser one such as 1:9 or 1:10 tastes lighter. Roast matters too: dark roasts often suit 1:7 to 1:8, while light roasts can sit better around 1:8 to 1:10.
| Pot size | Coffee | Water | Starting ratio |
|---|---|---|---|
| 1-cup | 7 g | 50 g | 1:7 |
| 3-cup | 18 g | 150 g | 1:8 |
| 6-cup | 36 g | 300 g | 1:8 |
| 9-cup | 54 g | 450 g | 1:8 |
If I had to boil the whole guide down to one line, it would be this: keep the basket full, keep the water below the valve, and change only one thing at a time.
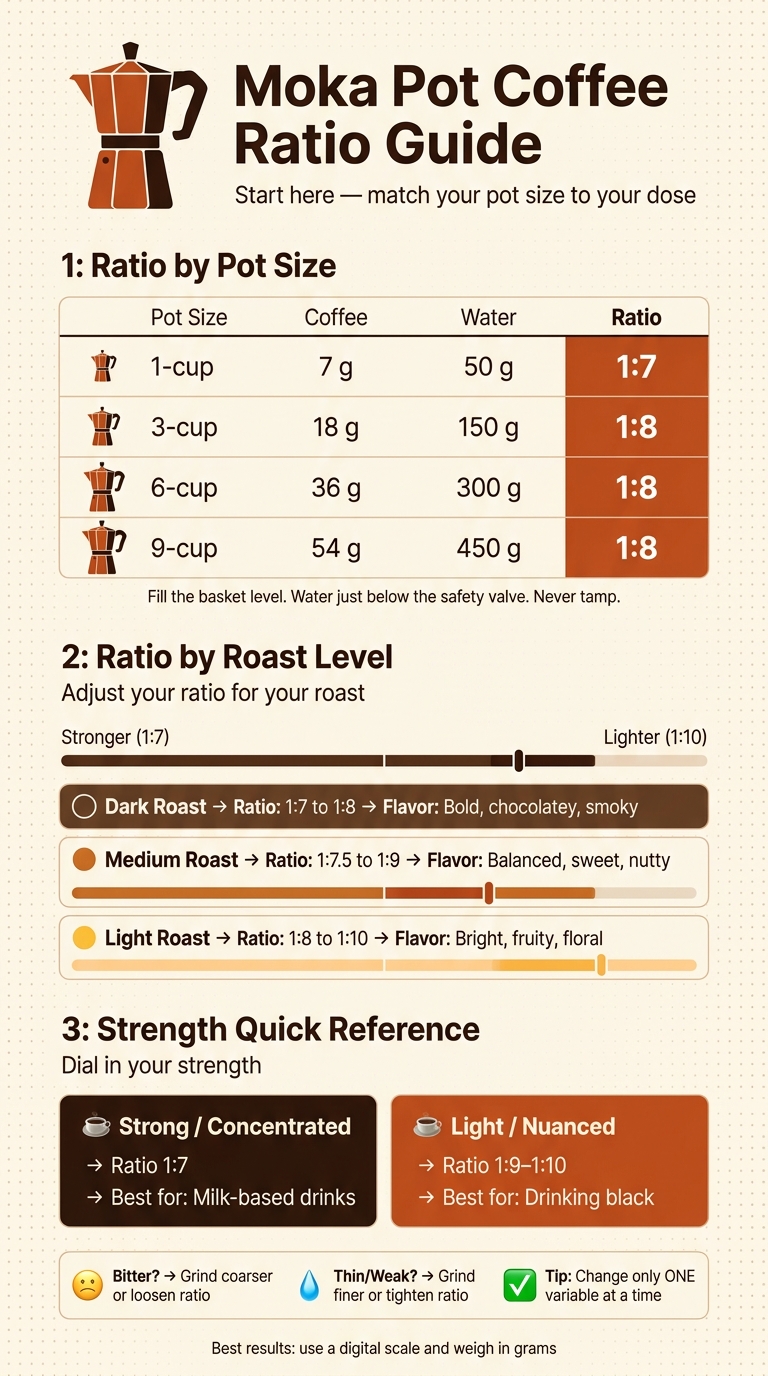
Moka Pot Coffee Ratio Guide by Pot Size & Roast Level
Moka Pot 1 Cup - Reliable Recipe
sbb-itb-cca2aed
Choose a starting ratio based on moka pot size
A moka pot basket holds a set amount of coffee grounds, and that limit tells you how much coffee you can use. If you underfill it, the brew can taste weak and watery. So it helps to treat the basket size as your starting point, then match your coffee weight to that capacity.
Ratio guide for 1-cup, 3-cup, 6-cup and 9-cup moka pots
From there, the next job is simple: pick a starting ratio that fits your pot size.
| Pot size | Coffee (g) | Water (g) | Ratio |
|---|---|---|---|
| 1-cup | 7 g | 50 g | 1:7 |
| 3-cup | 18 g | 150 g | 1:8 |
| 6-cup | 36 g | 300 g | 1:8 |
| 9-cup | 54 g | 450 g | 1:8 |
These figures are starting points, not fixed rules. Weigh your coffee in grams if you want results you can repeat without guesswork.
Worked example: scaling a recipe within the safety limits
Let’s say you’ve got a 6-cup pot and want a brew with a bit more punch. At a 1:8 ratio, the basket takes 36 g of coffee with 300 g of water. To make it stronger, move the coffee up to 40 g and keep the water at 300 g, making sure the water stays below the safety valve. Don’t overfill the basket or tamp the grounds down. That helps keep the pressure safe and the extraction even.
Once you’ve got a starting ratio for your pot size, you can tweak it for strength and roast level.
How to adjust the ratio for stronger or lighter coffee
Start with the ratio from the pot-size guide, then tweak it to suit your taste. The main control here is the coffee-to-water ratio. Tighten it if you want a stronger brew. Loosen it if you want something lighter.
Once you’ve got your baseline ratio, strength mostly comes down to how far you tighten or loosen it within the basket limit.
For a stronger brew, tighten the ratio to about 1:7. That gives you a bold, full-bodied cup that tends to work well with milk-based drinks.
For a lighter brew, loosen the ratio to about 1:9–1:10. The result is a lighter, cleaner cup, which usually suits drinking black.
Ratio suggestions by strength preference
| Strength preference | Suggested ratio | Best suited for |
|---|---|---|
| Strong / concentrated | 1:7 | Milk-based drinks |
| Light / nuanced | 1:9–1:10 | Drinking black |
Fixing bitter, thin or weak brews
If your coffee tastes bitter, it usually points to over-extraction. Start by grinding coarser, then loosen the ratio a little if needed.
If the cup tastes thin or under-extracted, go finer on the grind or tighten the ratio.
If it tastes weak, you’ll usually need more coffee for the same amount of water.
Roast level also changes how these ratios show up in the cup.
How roast level affects your moka pot ratio
Once you’ve got a baseline for your pot size, roast level is the next thing to tweak. It changes how the coffee extracts in the moka pot. Darker roasts usually extract with less effort than lighter ones, so your starting ratio should move with that.
Get that starting point right and life gets easier. You’re working with the coffee, not forcing it.
Starting ratios for light, medium and dark roasts
Use the ranges below as your starting point.
| Roast level | Starting ratio | Typical flavour | Too sour or thin | Too bitter or harsh |
|---|---|---|---|---|
| Light | 1:8 to 1:10 | Bright, fruity, floral | Grind finer | Grind coarser |
| Medium | 1:7.5 to 1:9 | Balanced, sweet, nutty | Grind finer | Grind coarser |
| Dark | 1:7 to 1:8 | Bold, chocolatey, smoky | Grind finer | Grind coarser |
Freshness, bean density and grind consistency also shape the cup. Beans are at their best when used within two to four weeks of their roast date.
If the cup tastes off, change one thing at a time: ratio, grind size or heat.
A step-by-step moka pot method from weighing to serving
Use your chosen ratio in the method below.
- Weigh: Measure your coffee and water in grams with a digital scale, based on your chosen ratio.
- Grind: Go for slightly finer than filter coffee - about the texture of fine table salt. A burr grinder helps here because it gives you a more even particle size than a blade grinder.
- Fill the lower chamber: Add water to just below the safety valve. Using pre-heated water from a kettle can help stop the grounds scorching on the hob.
- Fill the basket: Spoon in the grounds until level. Do not tamp or press them down - that can restrict flow and lead to uneven extraction.
- Brew over gentle heat: Keep the heat low to medium-low. High heat tends to scorch the coffee and throw the brew out of balance.
- Remove at the first gurgle: As soon as the flow turns pale or you hear the first gurgling sound, take the pot off the heat. Leave it longer and bitter, harsh flavours can creep into the cup.
- Stir before serving: Give the coffee in the upper chamber a quick stir so the strength is more even from top to bottom.
Conclusion: How to find your best moka pot ratio
Your best moka pot ratio will usually land somewhere between 1:7 and 1:10. The right spot depends on your pot size, your roast level, and how strong you want the coffee to taste in the cup.
Once you’ve chosen a starting point, keep the basket fill and water level the same each time. That way, it’s much easier to judge what’s working and what isn’t. Change one variable at a time.
Start with the dose, then tweak from there. Small, measured changes are the fastest way to dial in your best moka pot ratio.
FAQs
What grind size works best for a moka pot?
Use a grind that’s a touch finer than standard filter coffee, but not nearly as fine as espresso. A texture like table salt is usually the sweet spot.
That grind helps the water move through at the right pace, which gives you a more balanced extraction. Go too fine and you can end up with bitterness from over-extraction. Go too coarse and the coffee may taste sour or thin. From there, make small tweaks to match your taste.
Can I use pre-boiled water in a moka pot?
Yes. Starting with hot water in the base chamber can shorten the time the coffee grounds spend sitting above heat while the moka pot comes up to temperature on the hob. That can help you avoid a burnt or overly bitter taste.
For the best result, use water at 90°C to 96°C. If you’ve just boiled the kettle, let it sit for 30 seconds to 2 minutes before pouring.
Why does my moka pot coffee taste bitter or weak?
Bitter moka pot coffee usually points to over-extraction. In plain English, that means the water is pulling out too much from the grounds. The usual culprits are a grind that's too fine, a brew that runs too long, or heat that's too high. A slightly coarser grind and lower heat often sort it out.
Weak coffee is usually a sign of under-extraction. In that case, the water isn't pulling enough from the coffee. To get a stronger cup, add a bit more coffee to the basket or go for a slightly finer grind.